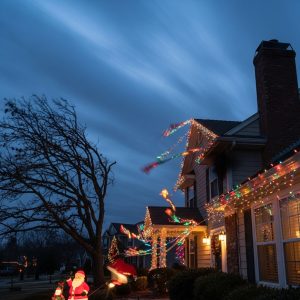
Last December, I woke up at 2 AM to the smell of burning plastic. My heart stopped. I ran downstairs expecting to find flames, but instead discovered my outdoor Christmas lights had melted through their extension cord where I’d coiled up the excess length and shoved it behind a bush. The cord was scorched black, the plug was half-melted, and I was about three hours away from a legitimate house fire. That terrifying night was the wake-up call I needed to take Christmas lighting seriously instead of treating it like a casual decoration project.
I’ve been putting up Christmas lights for seventeen years, first helping my parents as a teenager, then decorating my own places as an adult, and eventually helping friends and neighbors with their displays. I’ve made virtually every mistake possible, from the merely annoying (spending hours untangling last year’s lights) to the genuinely dangerous (overloading circuits and creating fire hazards). I’ve stood on wobbly ladders in freezing rain, stapled through live wires, and created electrical nightmares that would make any electrician weep.
What’s pushed me to learn the right way has been a combination of near-disasters, costly mistakes, and honestly, embarrassment at how bad my displays looked compared to neighbors who knew what they were doing. I’ve watched displays fail spectacularly, sections going dark on Christmas Eve, entire strings dying after one storm, and setups that looked beautiful for three days before becoming a tangled, broken mess.
The frustrating part is that most Christmas lighting fails are completely preventable.
They happen because people (myself included for years) treat lights as a casual decoration rather than an electrical system that needs planning and proper execution. We rush the setup, skip safety steps, use whatever equipment we have lying around, and hope for the best. Sometimes we get lucky. Sometimes we wake up to burning plastic smells at 2 AM.
Why Christmas Lights Fail More Often Than They Should
Before we start talks about specific failures, let’s talk about why Christmas lighting goes wrong so frequently. Unlike indoor decorations where mistakes are mostly aesthetic, outdoor lighting combines electrical systems, weather exposure, and often heights(a recipe for disaster) if you don’t know what you’re doing.
The main categories of failure are electrical (overloads, shorts, connection problems), mechanical (broken bulbs, damaged wires, failed clips), weather-related (water damage, wind damage, ice accumulation), and installation errors (wrong products for the application, improper securing methods, accessibility issues). Most displays experience multiple failure types simultaneously, creating cascading problems where one issue triggers several others.
What makes these failures particularly frustrating is timing. You typically don’t discover problems until after you’ve finished the installation, or worse, after the first big storm or cold snap. By then, fixing issues means redoing significant portions of work, often in worse weather conditions than your initial installation. Prevention is infinitely easier than repair, which is why understanding common fails before you start hanging lights is so valuable.
I learned this the expensive way, replacing damaged lights and equipment multiple times before figuring out what actually works. The knowledge I’m sharing came from mistakes that cost me money, time, and nearly my house. Learn from my failures instead of repeating them.
The Lighting Fails That Create Disasters
1. Daisy-Chaining Too Many Light Strings Together
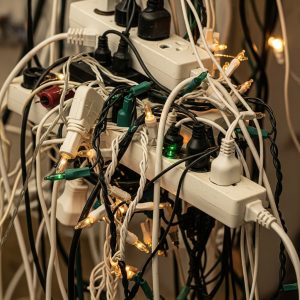
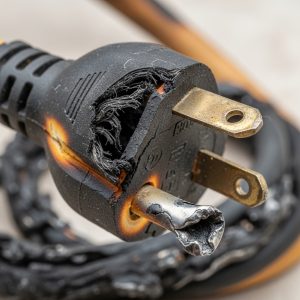
This is probably the most common and most dangerous fail. Each light string has a maximum wattage it can handle, clearly marked on the tag (that everyone throws away immediately). Most strings allow connecting three sets maximum. People routinely connect six, eight, or even ten strings together because it’s convenient and seems to work fine, until it doesn’t.
The danger isn’t immediate failure. The problem builds over time as the connection points heat up from handling more current than they’re designed for. This heat degrades the connections, increases resistance, generates more heat, and eventually you get melted plugs, blown fuses, or actual fires. I’ve melted three extension cord plugs before learning this lesson, including the one that nearly caused a fire.
The solution requires planning your display in zones, each with its own power source, rather than trying to run everything from one outlet.
Use outdoor-rated extension cords running from different outlets to different areas of your display. Yes, this means more cords and more setup work, but it also means your lights actually work safely for the entire season instead of failing (or catching fire) halfway through December.
Calculate your total wattage before buying lights. Add up all the strings you plan to connect, make sure you’re not exceeding the rated capacity, and build in a safety margin. If you’re pushing the limits, split your display into separate circuits. Your circuit breaker is a safety device, not an obstacle to work around.
2. Using Indoor Lights for Outdoor Displays
Indoor lights are cheaper, and they look similar to outdoor lights, so people use them outside all the time. This works fine, until the first rain or snow. Indoor lights aren’t weatherproofed. Water gets into connections, shorts the circuit, and you’re left with dark sections or completely dead strings. Even worse, you’ve created potential shock hazards.
I made this mistake my first year living in my own place, using leftover indoor lights on my porch because I didn’t want to buy new ones. They lasted exactly four days before a rainstorm killed half of them. The ones that still worked were dimmer and flickered. I ended up buying outdoor lights anyway, but only after wasting money on indoor lights that were now garbage.
Outdoor lights cost more because they have thicker insulation, sealed connections, and weather-resistant construction. That extra cost is insurance against failure and safety issues. The packaging clearly states indoor or outdoor( don’t assume indoor lights will survive outside) even under eaves or covered areas. Moisture still reaches them, and moisture kills electrical connections.
If you’re decorating covered porches or other semi-protected areas, you might think indoor lights are fine. They’re not. Temperature fluctuations create condensation. Wind blows rain into “protected” areas. Snow accumulates where you didn’t expect it. Use outdoor-rated lights for anything outside your actual heated interior space.
3. Securing Lights with Staples or Nails Through the Wire
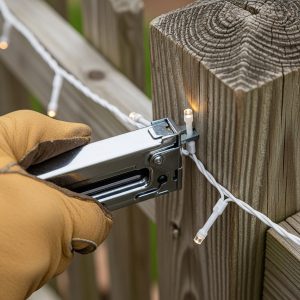
This seems like a quick, secure mounting method, and I used it for years before understanding the problem. When you staple or nail through or too close to the wire, you risk piercing the insulation. You might not break through completely, but you’ve weakened that spot. Over time, moisture penetrates, the wire corrodes, and you get shorts or breaks.
Even if you’re careful and don’t hit the wire directly, staples and nails pinch the insulation, creating stress points where wires tend to break. I’ve had multiple light strings die mid-season from broken wires at staple points, usually after wind or ice put stress on those already-weakened spots.
Proper light clips exist for every application, gutter clips, shingle clips, all-purpose clips, adhesive clips for smooth surfaces. They cost a few dollars and make installation and removal cleaner, faster, and safer. The clips hold lights securely without damaging them, and they make next year’s installation easier because you’re not prying staples out of wood or vinyl.
I resisted buying clips for years because they seemed like an unnecessary expense. After replacing my third set of lights damaged by staple installation, I finally bought proper clips. The difference was immediate, installation was faster, the lights looked neater because they weren’t drooping, and I haven’t damaged a string since switching to clips.
4. Leaving Connections Exposed to Weather
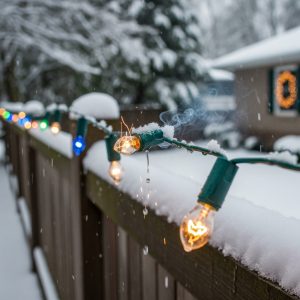
At every connection point, where two light strings join, where lights plug into extension cords, where extension cords plug into other extension cords, is a potential failure point. Water gets into exposed connections, ignite the metal contacts, and creates problems ranging from flickering lights to complete failure to potential shock hazards.
The first year I put lights on trees, I just plugged everything together and let the connections hang. After one freezing rain event, half my tree lights were dead. The connections had filled with ice, expanded, and destroyed the contacts. I spent an entire afternoon trying to dry and repair connections, only to eventually buy all new lights.
Outdoor connection covers exist specifically for this problem. They’re simple plastic enclosures that keep water out of plug connections. For a couple dollars per connection, you eliminate one of the most common failure points in any lighting display. Alternatively, you can wrap connections with electrical tape (not regular tape, it needs to be weatherproof) or use cable-tie zip-lock bags as improvised covers.
Position connections where water won’t naturally accumulate. Don’t let them sit in gutters, on the ground, or in low spots where water pools. Elevate connections, hang them from something, or secure them to vertical surfaces where water drains away rather than collecting. This simple positioning choice prevents countless connection failures.
5. Ignoring Wind Load and Mechanical Stress
Lights strung loosely might look fine on a calm day, but the first windstorm reveals the problem. Loose lights whip around, putting stress on connection points and mounting locations. This stress breaks wires, pulls clips loose, and destroys lights. I’ve lost entire roofline displays to wind because I didn’t secure them properly.
The solution is tensioning your lights appropriately during installation. They shouldn’t sag heavily (which looks bad and stresses the wire), but they also shouldn’t be pulled tight (which creates breaking stress). Find the middle ground where lights follow their mounting surface with slight slack for movement without excessive looseness.
For longer runs, use intermediate support points rather than just securing the ends. A twenty-foot gutter line needs support every five or six feet, not just at the corners. Tree wrapping needs to be anchored at multiple heights, not just wrapped around freely. Vertical strings hanging from eaves need weight at the bottom or securing at intervals to prevent whipping in wind.
I learned about wind load the hard way after a storm destroyed my roofline display that I’d spent four hours installing. The lights weren’t secured frequently enough, so wind got underneath them, lifted the strings away from the gutters, and snapped connections. Now I use twice as many clips as I initially think necessary, and my displays survive storms without damage.
6. Mixing Bulb Types and Voltages Incorrectly

LED lights and incandescent lights operate differently and shouldn’t be mixed on the same circuit haphazardly. LED lights use much less power, which sounds great, but mixing them with incandescent lights on the same line can cause issues with uneven brightness, flickering, or premature failure of either type.
Additionally, there are different voltage systems, standard 120V systems and low-voltage systems. Connecting the wrong voltage lights to the wrong power source destroys lights instantly. I’ve seen people plug low-voltage LED systems directly into standard outlets, frying the entire expensive set in seconds because they didn’t realize it needed a transformer.
Read your light packaging carefully and understand what you’re buying. If you’re using LED lights, use all LED on each circuit. If you’re mixing types, do it thoughtfully, don’t just connect whatever lights you have lying around. Keep LED and incandescent on separate circuits powered from different outlets.
The benefit of standardizing on one type is consistency, all your lights will be the same color temperature and brightness. Mixed lighting displays often look patchy, with some sections bright white (LED) and others warm yellow (incandescent). This inconsistency looks unintentional and messy rather than cohesive and planned.
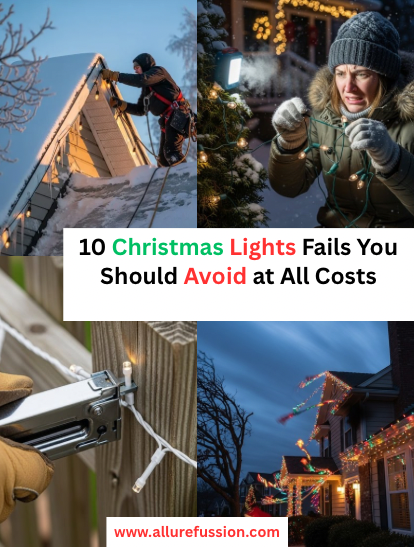
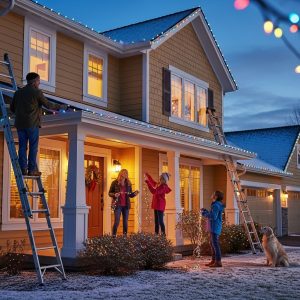
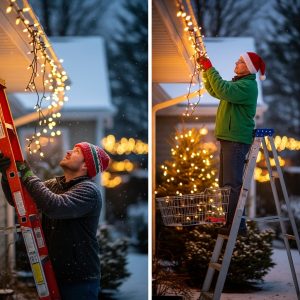
7. Installing Lights on a Ladder in Dangerous Conditions
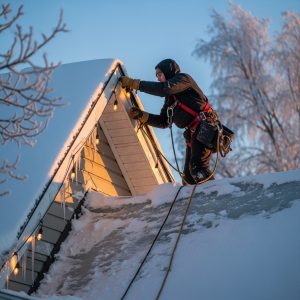
I’ve put up lights in light rain, on icy roofs, in high winds, and in darkness using only a headlamp. Every one of those situations was stupid and dangerous. The pressure to get lights up quickly, especially as Christmas approaches, makes people take ridiculous risks. Falls from ladders cause thousands of injuries every holiday season, and many could be prevented by simply waiting for better conditions.
Wet surfaces are slippery. Ice makes everything treacherous. Wind can knock ladders over. Darkness means you can’t see hazards or judge distances properly. These aren’t small inconveniences, they’re serious safety issues that lead to falls, injuries, and sometimes deaths. I’ve had close calls where ladders slipped on wet surfaces or where wind gusts nearly knocked me off balance on a roof.
Wait for dry, calm, daylight conditions to install lights. Yes, this requires planning ahead rather than rushing to get lights up the weekend before Christmas. Yes, it might mean your lights go up later than your neighbor’s. That’s fine. Your safety is worth more than beating someone else’s installation timeline.
Use appropriate ladders for your height requirements, extension ladders for high work, step ladders for lower areas. Have someone steady the ladder while you’re on it. Don’t overreach, move the ladder instead. These basics get ignored constantly because they’re inconvenient, but ignoring them is how people get hurt.
8. Not Testing Lights Before Installation
This seems obvious, but most people (including me for years) just assume lights will work and start installing them. You discover dead strings, broken bulbs, or malfunctioning sections only after you’ve spent hours hanging them. Then you face the choice of taking them down to replace them or leaving dark sections in your display.
Test every single string before installation. Plug them in, walk the entire length, verify every bulb works, check all functions if they’re programmable lights. This takes an extra twenty minutes before installation but saves hours of frustration and rework. I now test all my lights on the driveway the day before installation, separating working lights from ones that need repair or replacement.
While testing, also check the cords for damage, look for cracked insulation, exposed wires, or bent prongs on plugs. These issues only get worse during installation and use. Finding them during testing means you can repair or replace before they cause problems. I’ve caught multiple damaged cords during pre-testing that would have failed (or caused fires) if I’d installed them without checking.
Keep a few spare bulbs, fuses, and replacement plugs on hand for basic repairs. Many light strings die from a single blown fuse or broken bulb, easily fixed if you have the parts. Throwing away entire strings for simple failures is wasteful and expensive. Five minutes of testing and repair before installation prevents hours of troubleshooting later.
9. Creating Inaccessible Installations You Can’t Maintain
You install lights in a burst of energy and enthusiasm, reaching difficult spots, securing everything perfectly. Then a section fails mid-season, and you realize you can’t reach it to fix the problem. Or the season ends and you discover taking down the lights requires the same challenging ladder work in worse weather conditions.
I’ve created multiple installations that looked great but were nightmares to maintain or remove. Lights wrapped around the peak of my roof looked amazing but required dangerous ladder work to access. Tree lights secured fifteen feet up meant I couldn’t easily fix problems. Lights tucked into tight spaces were secure but impossible to reach for removal.
Plan for accessibility during installation. If you can barely reach a spot to put lights up, you definitely can’t maintain or remove them easily. Think about the entire lifecycle, installation, potential mid-season repairs, and eventual removal. If any of those steps requires dangerous or unreasonably difficult access, choose a different mounting location.
Leave yourself service loops, extra cord length at key points that allows you to unplug and replug sections without disturbing the entire installation. Position critical connections where you can reach them from the ground or from a safely positioned ladder. Design your display so individual sections can be isolated and worked on without affecting everything else.
10. Ignoring Your Electrical System’s Capacity
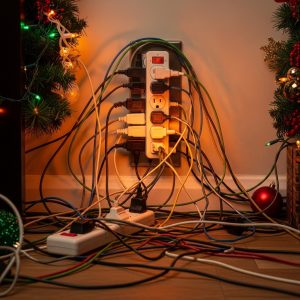
Your home’s electrical system has limits. Each circuit can handle a specific amount of current before the breaker trips. Each outlet can handle a specific load before it overheats. People routinely exceed these limits because the breaker doesn’t trip immediately, it handles the overload for a while before failing, creating the false impression that everything is fine.
I tripped my outdoor circuit breaker repeatedly one year before figuring out I was overloading it. I’d added more and more lights over several years without considering the total power draw. The breaker would trip at random times (usually when it was coldest and the heater kicked on, adding to the total load), killing all my outdoor lights.
The solution required spreading lights across multiple circuits, but I fought this reality for weeks before accepting it.
Calculate your total power consumption before installation. Every light string shows its wattage on the packaging or tag. Add up everything you’re planning to plug into each circuit. Make sure you’re staying well below the circuit’s capacity, if you have a 15-amp circuit (1800 watts maximum), don’t exceed 1400-1500 watts to leave safety margin and account for other devices on the same circuit.
If you’re pushing capacity limits, run extension cords from different circuits. My outdoor lights now pull from three different circuits, front yard, back yard, and side of house each on their own circuit. This requires more extension cords running from indoor outlets, but it means my display stays lit reliably instead of randomly failing when the electrical load peaks.