My first apartment Christmas was embarrassing. I had maybe $30 to spend after rent, and the dollar store ornaments I bought screamed “cheap” from across the room. That year taught me something valuable though: expensive-looking doesn’t mean expensive. It means understanding what creates that perception of quality, and then figuring out how to fake it.
Over the years, I’ve perfected the art of creating Christmas decorations that make guests ask where I shop, then look stunned when I tell them “my kitchen table and the craft store clearance aisle.” I’ve scrolled through countless Reddit threads where people share their DIY wins and fails, watched Quora discussions about budget decorating evolve from basic tips to genuinely clever hacks, and tested probably hundreds of projects to see what actually delivers that luxury look without the luxury price tag.
The DIY landscape has changed dramatically. Early 2010s Pinterest was all about complicated projects requiring specialty tools.
Now, the smartest DIYers focus on projects that use everyday materials in unexpected ways. The difference between a craft that looks homemade and one that looks professionally designed often comes down to a few key elements: clean execution, quality finishing touches, and understanding which corners you can cut and which ones you can’t.
I’ve made every mistake possible, hot glue strings showing, spray paint drips, wobbly structures, and color combinations that looked great in my head but terrible in reality. Each failure taught me something, and now I can spot the difference between a project that will photograph well and one that will actually look good in person under regular lighting. That distinction matters.
Why Some DIY Projects Look Cheap and Others Don’t
Before we jump into specific projects, let’s talk about what separates impressive DIY from obvious DIY. Three factors make the biggest difference: material choice, finish quality, and color restraint.
Material choice doesn’t mean expensive materials, it means materials that photograph well and have some weight or texture to them. A wooden ornament will almost always look better than a foam one, even if the foam costs more. Glass containers beat plastic every time. Natural materials like wood, metal, and actual greenery read as higher quality than their synthetic counterparts.
Finish quality is where most DIY projects fail. Visible hot glue, uneven paint coverage, frayed ribbon ends, or crooked elements instantly signal “homemade” rather than “handcrafted.” Taking an extra ten minutes to hide your glue seams, add a second coat of paint, or trim your edges cleanly makes the difference between something that looks like a kindergarten craft and something that looks boutique.
Color restraint might be the hardest lesson. More colors don’t create more impact, they create visual chaos. The most expensive-looking decorations typically use two or three colors maximum. Metallics (gold, silver, copper) paired with white or cream create instant elegance. Deep jewel tones with metallic accents look rich. Rainbow glitter explosions look like craft time at summer camp.
DIY Christmas Decorations that looks expensive but is not
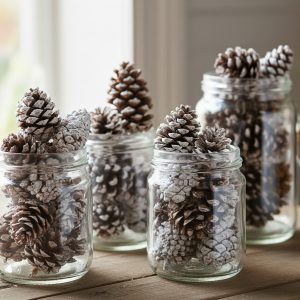
1. Frosted Pinecone Arrangements in Vintage Containers
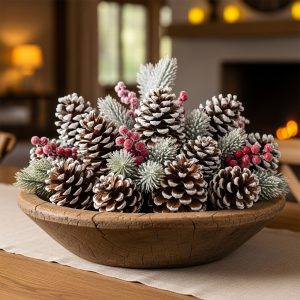
This project costs less than $5 but looks like something from a high-end catalog. Collect pinecones (free if you have trees nearby, or about $3 for a bag at craft stores), paint the tips with white acrylic paint, then dust with clear glitter while wet. Arrange them in interesting containers, old teacups, mason jars wrapped with burlap and lace, or vintage bowls from thrift stores.
The trick is in the container choice and presentation. A single frosted pinecone in a cheap container looks crafty. A cluster of them in a vintage brass bowl looks intentional and expensive. I found three tarnished brass bowls at Goodwill for $2 each, and they’ve been my go-to bases for five years now. Don’t clean the tarnish, it adds character.
2. Velvet Ribbon Wrapped Candlesticks
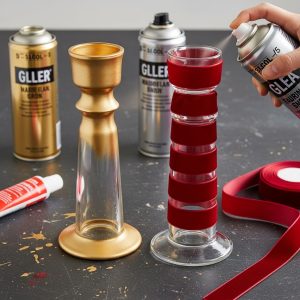
Plain glass candlesticks from the dollar store get transformed with wide velvet ribbon and metallic spray paint. Spray paint the base and top portions gold or silver (leaving the middle clear), let dry completely, then wrap velvet ribbon around the painted sections, securing with fabric glue on the back where it won’t show.
I use these with battery-operated taper candles, and guests consistently think they’re expensive designer pieces. The velvet texture is key, satin ribbon doesn’t have the same luxury feel. Buy velvet ribbon after Christmas when it goes on clearance, and you’ll have material for next year’s projects for pennies.
3. Epsom Salt Snow Globes
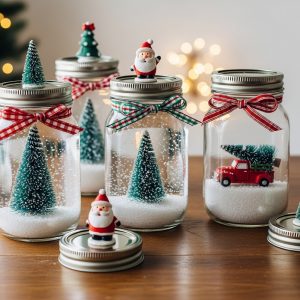
Take any glass jar (pasta sauce jars work great once labels are removed), glue a small figurine or miniature tree to the inside of the lid using waterproof glue, fill the jar with water mixed with glycerin (slows the “snow” fall), add Epsom salt for snow, seal the lid, and flip. The glycerin is the only specialty ingredient, but a small bottle costs $3 and makes dozens of globes.
These look magical on windowsills or mantels, especially grouped in varying sizes. The key to making them look expensive rather than crafty is choosing the right figurines, avoid anything too obviously plastic or bright colors. Cream or white ceramic pieces, small silver animals, or miniature bottle brush trees create the best effect.
4. Copper Pipe Geometric Ornaments

This sounds complicated but takes about 30 minutes once you get the hang of it. Buy copper pipe from the hardware store (the thinnest you can find works fine), cut it into equal lengths with a pipe cutter (about $10 but you’ll use it for years), and connect pieces using small zip ties painted copper. Create geometric shapes, triangles, diamonds, hexagons.
These modern ornaments look like they came from West Elm. Hang them individually with fishing line, cluster several together at different heights, or attach them to greenery. The industrial-chic vibe reads as expensive minimalism. A 10-foot copper pipe costs about $8 and makes approximately 15 ornaments.
5. Book Page Christmas Trees
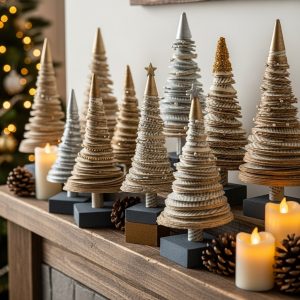
Old books (please use damaged ones, not valuable editions) from thrift stores provide pages for elegant paper trees. Roll individual pages into cones, securing with glue, then layer them on a foam cone base starting from the bottom. Spray the whole thing with metallic paint once assembled.
The result looks like expensive boutique decor, especially in gold or silver. These work beautifully in varying sizes clustered together. I make a set of three (small, medium, large) each year using different paint finishes, one gold, one silver, one left natural with just the book text showing. Total cost: about $5 for three trees.
6. Wine Cork Ornaments
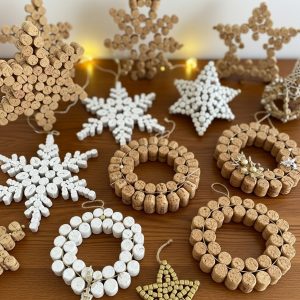
If you drink wine or know people who do, cork ornaments are essentially free. Glue corks together in patterns, snowflakes, stars, wreaths, or simple geometric designs. Leave them natural for a rustic look, or paint them white with gold tips for something more refined.
I’ve given these as gifts, and people are always surprised they’re made from wine corks because the execution looks so clean. The secret is using a strong adhesive (E6000 works best) and letting each connection dry completely before adding more corks. Attach a ribbon loop before the glue fully sets for hanging.
7. Painted Glass Bottle Vases

Save interesting glass bottles (wine bottles, olive oil bottles, anything with a nice shape), remove labels completely (soaking in hot soapy water helps), then spray paint them in metallic colors. Group odd numbers together (three or five looks better than two or four) and add single stems, even grocery store carnations look elegant in gold-painted bottles.
These create impressive mantlepiece or tablescape displays for almost nothing. I rotate mine for different seasons by changing what’s in them, so they’re useful year-round. The glass texture under the paint creates depth that solid ceramic doesn’t have, which is why these read as more expensive than they are.
8. Cinnamon Stick Bundles
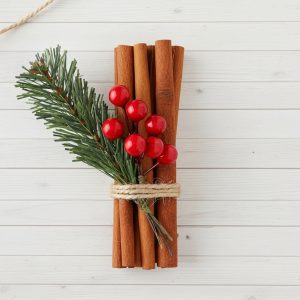
Cinnamon sticks tied with twine or ribbon, grouped in threes or fives, create rustic-elegant ornaments or package decorations. Buy bulk cinnamon sticks online (much cheaper than grocery store prices), bundle with natural twine, and tuck in a sprig of artificial or real greenery plus a few berries.
These work beautifully attached to packages, hung on trees, or scattered across tablescapes. The natural element combined with the wonderful scent creates a sensory experience that feels luxurious. Plus, your house smells amazing. Cost per bundle, about 50 cents.
9. Fabric Scrap Garland

Cut fabric strips (use festive patterns or stick to solid colors in your chosen scheme) about 1 inch wide and 8 inches long, then tie them along a length of twine or ribbon. No sewing required. This works especially well with flannel, burlap, or lace for different effects.
I make these from fabric remnants I get from the clearance section of fabric stores, usually 50-75% off already reduced prices. A garland that would cost $30-40 retail costs me maybe $5 in materials and an hour of TV-watching time. Drape it on trees, across mantels, or along stair railings.
10. Concrete Candle Holders
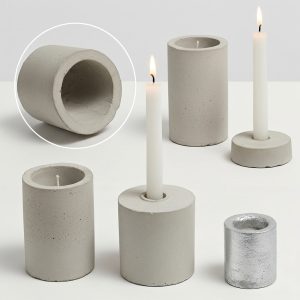
Mix concrete (available at hardware stores for about $8 for a large bag), pour into molds (use plastic cups, toilet paper rolls, or silicone molds), insert a taper candle while wet to create the hole, and let cure. Once dry, remove from molds and you have heavy, modern candle holders.
The weight is what sells these as expensive pieces. They feel substantial and well-made. Paint them if you want, or leave the natural concrete for an industrial look. Metallics look particularly good on concrete. One bag of concrete makes dozens of holders, bringing your per-piece cost to under $1.
11. Bleached Pinecone Displays
This creates a completely different look from painted pinecones. Soak pinecones in a solution of half bleach, half water for 24 hours, then dry thoroughly. They’ll turn a beautiful whitewashed color. Display in clear glass vessels, wooden bowls, or arrange on trays.
These look incredibly expensive and beachy-elegant, perfect if you’re going for a coastal Christmas vibe. The natural variation in bleaching creates interesting patterns. I did this with about 50 pinecones for a large display, and the only cost was the bleach I already had. Safety note: do this outside or in a very well-ventilated area.
12. Embroidery Hoop Wreaths

Wooden embroidery hoops (cheap at craft stores, especially smaller sizes) become wreath bases. Wrap them with ribbon, fabric strips, or yarn in your color scheme, then attach greenery, berries, small ornaments, or other decorative elements with hot glue.
These modern, minimalist wreaths look nothing like traditional Christmas wreaths, which is exactly why they read as expensive and design-forward. I particularly love making several in graduating sizes and hanging them together. A 6-inch hoop costs about $2, and decorating materials might add another $3-5.
13. Gold Leaf Ornaments
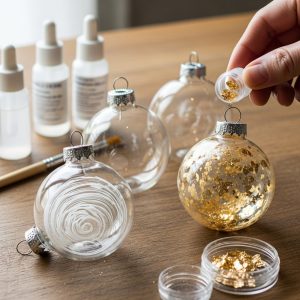
Clear glass ornaments (buy boxes of them cheap after Christmas for next year) get elevated with gold leaf. Remove the top, apply liquid gold leaf adhesive in random patterns inside the ornament using a small brush, let get tacky, then add gold leaf flakes, swirl around, and let dry.
This technique creates ornaments that look like expensive boutique purchases. The random, organic pattern of the gold creates visual interest. Hang these on trees or in windows where light hits them. A small gold leaf kit costs about $8 and decorates 30-40 ornaments.
14. Birch Log Candle Holders
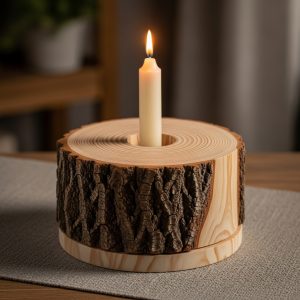
If you have access to birch logs (or any logs really, but birch looks particularly expensive), cut rounds about 2-3 inches thick, drill holes in the top sized for taper candles, and sand the bottom flat. That’s it.
The natural wood grain and simplicity read as expensive Scandinavian design. Group several together at varying heights with white candles for maximum impact. If you don’t have access to free wood, many lumber stores will cut rounds for you for a minimal charge. I’ve also found pre-cut wood rounds at craft stores.
15. Painted Mason Jar Luminaries
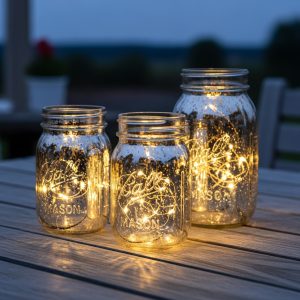
Mason jars get a bad reputation for looking cheap, but painted correctly, they transform. Spray paint the outside with frosted glass paint (gives a mercury glass effect), then add battery-operated tea lights or string lights inside.
The frosted finish is what elevates these from obviously jars to something that looks purpose-made. Group them on mantels, use them as pathway lights, or hang them with wire handles. A pack of six jars costs about $8, and one can of frosted spray paint covers 12-15 jars.
16. Sweater-Wrapped Vases
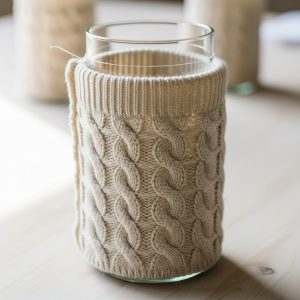
Old sweaters you’re about to donate get new life as vase wraps. Cut the sleeves off, slip them over cylinder vases, and secure at the top and bottom with thin wire or fishing line hidden under the fabric. The cable knit texture looks cozy and expensive.
These work particularly well for holiday centerpieces. Fill the vases with greenery, branches, or even just battery-operated lights. The texture contrast between glass and knit fabric creates visual interest. This costs nothing if you’re using sweaters you already own, and thrift store sweaters cost $3-5.
17. Dried Orange Slice Garland
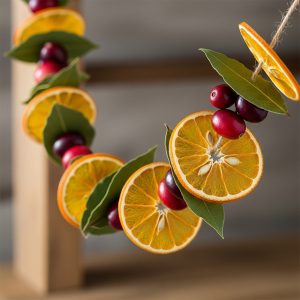
Slice oranges thinly (about 1/4 inch), bake at 200°F for 3-4 hours until dried, then string them together with cranberries and bay leaves using a needle and strong thread. This creates a natural, traditional garland that smells amazing and looks organic and intentional.
The key is slicing consistently and drying completely, underdried slices will mold. These garlands photograph beautifully and last the entire season. I made a 6-foot garland last year for the cost of three oranges ($2) and a bag of cranberries ($3). Much cheaper than store-bought, and it looked better.
18. Glitter-Dipped Branches

Collect interesting branches (look for ones with good shapes and multiple smaller branches), spray the tips with adhesive, and dip in glitter. Display them in tall vases, either alone or mixed with greenery.
This sounds potentially tacky, but executed correctly with high-quality glitter (not craft store kid glitter, buy the nice stuff in metallics or white, it looks magical and expensive. The natural branch texture combined with the sparkle creates beautiful contrast. Free branches plus $5 glitter equals showstopping displays.
19. Leather Ornament Hangers
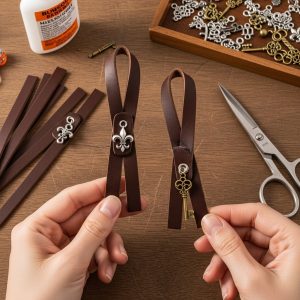
Cut thin strips of leather (or faux leather) about 6 inches long, fold in half, and attach ornaments to the looped end. These replace standard ornament hooks and instantly upgrade your tree’s look.
This detail seems small, but the leather hangers elevate every ornament they’re attached to. They create a cohesive, designed look even if your ornaments are mismatched. Buy a remnant piece of leather from fabric stores for $5-10, and you’ll have enough for your entire tree plus some to give as gifts with ornaments.
20. Concrete or Plaster Dipped Figurines
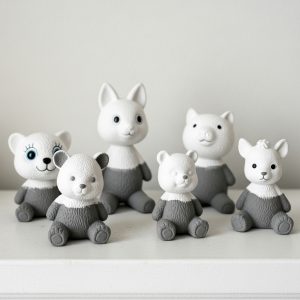
Small plastic toy animals or figurines dipped in concrete or plaster of Paris become matte, modern decorative objects. Mix your medium to a thick but pourable consistency, dip figurines halfway (leaving feet or bottom exposed for stability), let dry, then arrange on mantels or shelves.
The transformation from cheap toy to design object is remarkable. These look like expensive ceramic pieces. I particularly love doing this with small deer, birds, or trees. A box of plaster costs $6 and coats dozens of items. Toys from dollar stores or thrift stores add maybe $1-2 per piece.
21. Burlap and Lace Luminaries
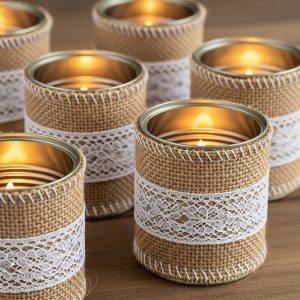
Wrap tin cans (labels removed, edges smoothed with pliers) with burlap secured with hot glue, then add a band of lace around the center. Place tea lights or battery-operated lights inside. The mixed textures of rough burlap and delicate lace create interest.
These work beautifully lining pathways, grouped on tables, or scattered across mantels. The vintage-rustic vibe is very popular right now. Materials cost is minimal, burlap ribbon is cheap, lace remnants even cheaper, and cans are free. Total cost per luminary: less than $1.
22. Painted Wooden Bead Garland

Large wooden beads (craft stores sell them in bulk) strung on strong cord or wire, painted in your color scheme, create modern, Scandinavian-looking garland. Paint some beads solid colors, leave others natural, maybe add some metallic for sparkle.
These garlands look expensive because of their simplicity and the natural material. They work on trees, draped across mantels, or even as napkin rings for holiday dinners. A bag of 100 beads costs about $8, and one bag makes 6-8 feet of garland depending on bead spacing.
23. Fabric-Wrapped Foam Cone Trees
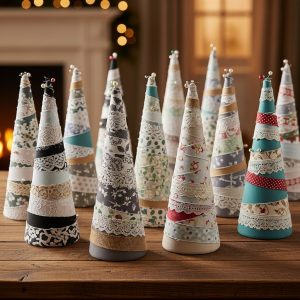
Foam cones from craft stores wrapped in fabric strips create elegant alternative trees. Cut fabric into strips, secure one end to the bottom of the cone with a pin, then wrap upward in a spiral, overlapping slightly, pinning as needed.
Choose luxe fabrics: velvet, silk, or even faux fur, in solid colors. Top with a decorative element (a star, a button, a bead, etc.). These look far more expensive than the $3 foam cone and fabric scraps they’re made from. Make a forest of them in varying heights for impressive displays.
24. Washi Tape Ornaments
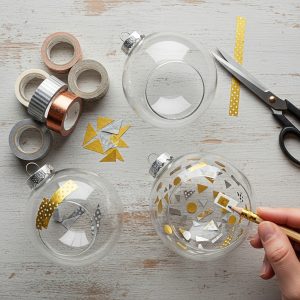
Clear acrylic or glass ornaments get geometric patterns using metallic or patterned washi tape applied to the inside. Remove the ornament top, cut tape into shapes (triangles, strips, circles), and press onto the inside of the ornament from the top opening using a pencil eraser to smooth.
The modern, graphic look of these is very current and expensive-looking. The key is using high-quality washi tape in sophisticated patterns and colors, skip anything too cute or childish. A roll of nice washi tape costs $3-5 and decorates many ornaments.
25. Metallic-Painted Pasta Ornaments
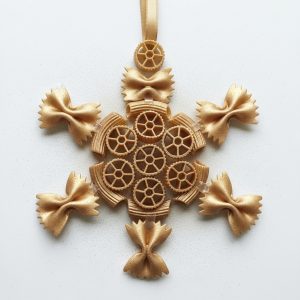
This sounds absurd, but hear me out. Certain pasta shapes—wheels, bowties, rigatoni—spray painted in metallics and assembled into snowflakes or geometric shapes look surprisingly sophisticated. The texture of the pasta creates interesting dimension.
Glue pasta pieces together in your chosen design using hot glue or E6000, let dry completely, then spray paint in gold, silver, or copper. Add a ribbon loop for hanging. These are conversation starters that cost pennies per ornament. A box of pasta costs $1, and one can of spray paint covers dozens of ornaments.
What I’ve Learned About Successful DIY
After years of trial and error, I’ve identified the patterns that separate successful DIY projects from disappointing ones. First, don’t try to rush. The projects that look homemade are usually the ones where someone tried to finish too quickly. If the glue needs 24 hours to cure, wait 24 hours. If something needs two coats of paint, do two coats.
Second, invest in a few quality tools and supplies that you’ll use repeatedly. A good hot glue gun (not the cheapest one), quality spray paint brands that don’t drip or leave texture, strong adhesives for different materials, and sharp scissors or cutting tools make every project turn out better. These tools cost more upfront but last for years.
Third, batch your projects. If you’re making painted ornaments, paint all of them at once. If you’re wrapping things in fabric, do all of them together. This is more efficient and creates consistency across your decorations. Consistent execution reads as professional rather than scattered.
Finally, know when to quit. Not every Pinterest project works for everyone. If something isn’t turning out well after a genuine attempt, it’s okay to abandon it rather than pushing through to a disappointing result. I’ve scrapped projects halfway through because they weren’t meeting my standards, and I’ve never regretted it.