Decorating a condo or apartment especially at festive period (Christmas decorating) is no joke, I still remember my first attempt, a chaotic mess of tangled lights and a tree that leaned precariously to one side. Fast forward years later after trial and error, I’ve transformed countless homes during the holiday season, worked with families across different budgets, and witnessed firsthand how the right decorative choices can completely reimagine a living space. Through trial and error, countless Pinterest fails, and some genuinely magical successes, I’ve learned what actually works versus what just looks good in photos.
What strikes me most about Christmas decoration trends is how they’ve shifted from the maximalist approach of the early 2000s to today’s more intentional, story-driven designs. I’ve watched discussions on Reddit evolve from simple light-hanging tips to sophisticated debates about color psychology and spatial planning. Quora threads reveal homeowners grappling with the same questions year after year: How do I make my space feel festive without overwhelming it? How can I create that cozy, magazine-worthy atmosphere on a realistic budget?
The truth is, transforming your home for Christmas doesn’t require an unlimited budget or professional training. What it needs is strategic thinking about focal points, understanding how light and texture work together, and knowing which investments will serve you for years to come.
Setting the Foundation: Understanding Your Space Before You Decorate
Before I start dishing out ideas, take a moment to walk through your home with fresh eyes. Notice where natural light falls, which areas draw attention when you enter a room, and where your family actually spends time.
This assessment will guide your decoration choices far better than any Pinterest board. I’ve seen too many homes where beautiful decorations go unnoticed because they’re placed in corners nobody looks at, while high-traffic areas remain bare.
Consider your existing color scheme and furniture arrangement. Christmas decorations should complement your home, not fight against it. If you have modern minimalist furniture, ultra-traditional Victorian ornaments might create visual discord. Similarly, if your home features warm wood tones, leaning into natural, organic decorative elements will create a more cohesive look.
The Transformative Ideas That Actually Work
1. Create a Dramatic Entryway Moment
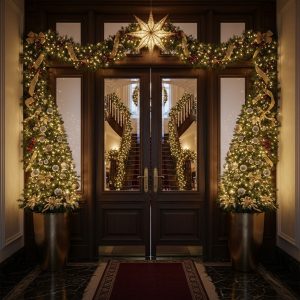
Your entryway sets the tone for everything that follows. I’ve found that a statement garland draped along your staircase railing or across a console table makes an immediate impact. But here’s what most guides won’t tell you: the magic lies in the layering. Start with a high-quality faux greenery base (real garlands die too quickly indoors), then weave in elements with varying textures, eucalyptus sprigs, pinecones, velvet ribbon, and battery-operated fairy lights.
Last year, I worked with a family who felt their narrow entryway couldn’t handle decoration. We installed a vertical “tree” made from wall-mounted greenery branches arranged in a triangular shape, dressed with lightweight ornaments. It took up zero floor space but created a stunning first impression. The key is thinking vertically when horizontal space is limited.
2. Layer Your Lighting Like a Professional
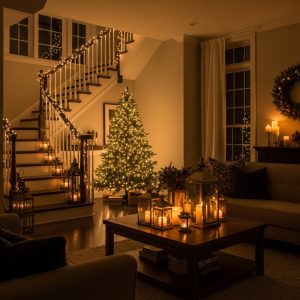
Lighting makes or breaks Christmas ambiance, yet most people rely solely on their tree lights. I’ve learned to think of holiday lighting in three tiers: ambient (overhead fixtures with warm bulbs), accent (string lights highlighting architectural features), and task (candles or lanterns on surfaces).
Replace your standard bulbs with warm-toned LED lights throughout main living areas, this simple switch creates an instant cozy glow.
Then add string lights in unexpected places: wrapped around stair balusters, tucked behind floating shelves to create a halo effect, or draped along window frames. I’m particularly fond of using battery-operated pillar candles in hurricane vases of varying heights clustered on coffee tables. They provide flickering warmth without the fire hazard, especially important if you have curious pets or children.
3. Design a Show-Stopping Mantel Display

If you have a fireplace mantel, this is prime real estate for holiday magic. I’ve discovered that the most visually appealing mantels follow the “rule of three”, using three different height levels to create visual interest. Start with a substantial centerpiece (a large lantern, mirror, or wreath), then build outward with medium-height elements (candlesticks, small trees, or decorative boxes), and finally add low-lying items (greenery garlands, ornament clusters, or figurines).
One technique that consistently wows people is the “overflow” effect, let your greenery cascade slightly off the mantel edge, as if it’s naturally spilling over. This creates movement and breaks up the rigid horizontal line. I also like tucking in unexpected elements like vintage books tied with twine, frosted pinecones in wooden bowls, or even small wrapped packages that add dimension.
4. Transform Your Windows into Glowing Focal Points

Windows become magical at night when treated properly. Instead of just hanging wreaths, think about creating window vignettes. Place a small decorated tree or a collection of different-sized lanterns on the windowsill, backlit by the outdoor darkness.
From outside, these create a warm, inviting glow that transforms your home’s exterior appearance.
For street-facing windows, I recommend window clings or removable snowflake decals paired with simple white lights around the frame. This approach gives you curb appeal without requiring outdoor light installation, which many people dread. Inside, hang crystals or glass ornaments at varying heights using clear fishing line, they’ll catch both natural daylight and lamp light, creating unexpected sparkles throughout the day.
5. Build a Hot Chocolate Station That Becomes a Gathering Spot

Functional decoration serves double duty, and nothing says Christmas like a dedicated hot chocolate bar. Transform a bar cart, side table, or even a section of your kitchen counter into a self-serve station.
Use tiered stands to display different elements: mugs on the bottom, toppings (marshmallows, candy canes, whipped cream)
in the middle, and decorative elements on top.
The decoration comes through thoughtful presentation, use apothecary jars for toppings, add a small chalkboard sign with menu options, include a festive table runner, and incorporate some battery-operated fairy lights wrapped around the structure. I’ve seen families gather around these stations repeatedly throughout the season, making it both decorative and experiential.
6. Create Ceiling Interest with Hanging Installations
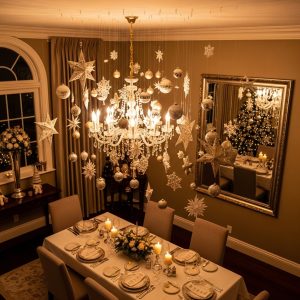
Most people forget to look up, but ceiling space offers huge decorative potential. In my dining room, I hang a collection of ornaments at different heights using clear fishing line attached to a curtain rod mounted to the ceiling. This creates a floating ornament “chandelier” that catches light beautifully and transforms an often-overlooked area.
For higher ceilings, consider suspending paper snowflakes, stars, or even a simple branch decorated with lights and ornaments. A friend of mine hangs a horizontal ladder (the decorative wooden kind) from her living room ceiling and drapes it with greenery and lights, it’s become her signature holiday feature and costs almost nothing to create.
7. Style Your Bookshelves as Miniature Winter Wonderlands

Bookshelves often get neglected during holiday decorating, but they’re perfect canvases for creating small vignettes.
I remove about a third of the books (temporarily storing them elsewhere) to create space for decorative elements. Intersperse remaining books with small trees, framed holiday prints, candles, and ornament clusters.
Here’s a technique that works beautifully: arrange books by color to create a gradient effect, then style each shelf as its own mini-scene. One shelf might feature all white and silver elements, another warm copper and gold, and another natural wood and greenery. This creates visual interest while maintaining cohesion through your color choices.
8. Design an Advent Calendar Wall Display
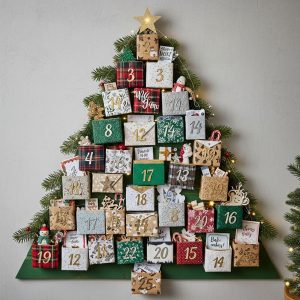
Advent calendars have evolved far beyond chocolate-filled boxes. Create a large-scale wall display using small bags, boxes, or envelopes numbered 1-25 and arranged in a tree shape, wreath formation, or simply a grid. Each container holds a small treat, note, or activity card.
What makes this decorative rather than just functional is how you present it. Use consistent wrapping (kraft paper with red twine, white boxes with gold numbers, or fabric pouches with embroidered dates), mount it on a decorative board or directly on the wall, and surround it with complementary decorations. This becomes an interactive focal point that changes daily, keeping the visual interest fresh throughout December.
9. Transform Your Dining Table into a Festive Tablescape

Your dining table deserves more than a quick centerpiece. I’ve learned that layering creates depth and interest. Start with a runner (or even a length of burlap or plaid fabric), add a centerpiece that runs the length of the table (a garland interspersed with candles works beautifully), then incorporate height with tall candlesticks or small decorative trees.
Don’t forget the place settings, chargers in metallic tones, napkins folded creatively, and small decorative elements at each place (a mini ornament on each napkin, a sprig of rosemary tied with twine, or a handwritten place card) transform an everyday table into something special. Even if you’re not hosting formal dinners, keeping your table styled throughout the season elevates your entire dining area.
10. Bring the Outdoors In with Natural Elements
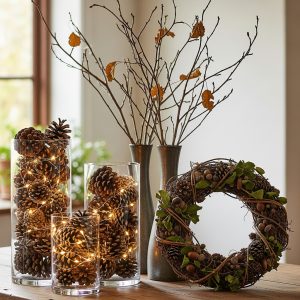
Some of the most striking decorations I’ve created involved natural materials. Collect pinecones, branches, berries, and evergreen clippings (with permission if not from your property), then use them throughout your home. Fill glass vases with pinecones and battery-operated lights, arrange branches in tall vessels, or create simple wreaths from foraged materials.
I’m especially fond of bringing in birch logs to create rustic displays, stack them in corners topped with lanterns, use them as candleholders by drilling shallow holes in the top, or simply lean several against a wall for architectural interest. These natural elements ground your decoration scheme and provide textural contrast against shinier ornaments and lights.
11. Design a Christmas Card Display That Doubles as Decor

Rather than hiding cards in a drawer, make them part of your decoration. String twine or ribbon across a wall or mantel and use small clothespins to attach cards as they arrive. This creates an evolving display that becomes more visually interesting throughout the season.
Alternatively, arrange cards on a decorative ladder leaning against a wall, pin them to a large cork board framed with greenery, or use a photo rail system to display them shelf-style. I love how this celebrates your connections with others while adding color and visual interest to your space. Plus, it solves the perennial problem of what to do with all those cards.
12. Create Cozy Corners with Textile Layering

Christmas decoration isn’t just visual, it’s doctrinated. I’ve watched homes transform simply by adding throws, pillows, and soft textures. Drape chunky knit blankets over sofas, swap regular pillows for ones with holiday patterns or textures (velvet, faux fur, cable knit), and add a plush rug if you have hard floors.
The magic happens when you layer multiple textures together. A leather chair becomes inviting with a faux fur throw and a velvet pillow. A wood bench gains warmth with a buffalo check cushion. These textile additions make spaces feel cozy and Christmas-y without requiring any actual “decorations,” and they serve the practical purpose of keeping everyone warm during movie marathons.
13. Install a Photo Display Documenting Christmas Memories
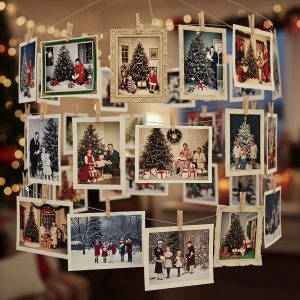
Create a rotating gallery wall or photo clothesline featuring Christmases past. This personal touch makes your decoration meaningful and sparks conversations with guests. I use simple clip frames that make photo swapping easy, or I print photos and attach them to a board with decorative washi tape.
Consider theming your photo display, all black and white photos for a classic look, photos from the same location over multiple years showing how your family has grown, or photos that highlight specific traditions. Frame this display with string lights or greenery to integrate it with your other decorations. This approach adds personality and storytelling to your decorative scheme in a way that store-bought items never can.
14. Build a Winter Village Display with Dimension
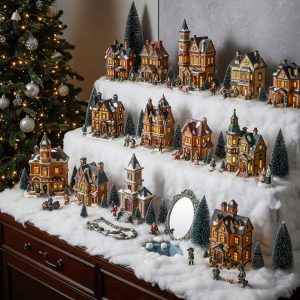
Miniature village displays have made a comeback, but the key to making them look sophisticated rather than cluttered is creating landscape and depth. Don’t just line buildings in a row, create levels using risers covered with cotton batting “snow” or white fabric, add tiny LED lights inside buildings, and incorporate miniature trees, figurines, and even a small mirror to represent a frozen pond.
I’ve had success using old books stacked and covered with white fabric to create hills and valleys for villages. Add a backdrop (a simple poster board painted with a winter sky gradient) behind the display to enhance the three-dimensional effect. The result is a charming scene that draws people in to examine the details rather than a flat, forgettable arrangement.
15. Design an Entryway Drop Zone That’s Festively Functional

Your entryway shouldn’t just look pretty, it needs to handle the reality of winter: wet boots, heavy coats, and shopping bags. Create a festive drop zone with hooks for stockings (label each with family members’ names), a bench with storage underneath for boots, and baskets for mittens and scarves.
Decorate this functional space with a wreath above the bench, a holiday-themed doormat, and a tray for keys and mail decorated with seasonal touches. I like placing a small tree or large lantern in the corner near the bench and keeping a basket of wrapped packages visible, it reminds you of your progress on gift-giving while contributing to the festive atmosphere. This space works hard but still contributes to your home’s overall Christmas transformation.
Final Thoughts and Action Steps
After years of decorating homes and refining these techniques, I’ve realized the most successful Christmas transformations share common traits: they’re intentional rather than random, they consider how spaces are actually used, and they blend beauty with functionality.
Start small if you’re feeling overwhelmed. Choose three ideas from this list that excite you most and implement those thoroughly rather than attempting everything at once. I’ve seen more impact from three well-executed ideas than from a dozen half-hearted attempts.
Consider your decoration timeline, too. I spread my decorating over several days, tackling one area at a time. This prevents burnout and lets you live with your choices for a day or two before moving on, sometimes you’ll realize something needs adjusting once you’ve seen it in different lighting or at different times of day.
Finally, take photos of your finished spaces. Not for social media necessarily, but for yourself next year. I keep a simple folder on my phone showing what worked, what didn’t, and ideas I want to try next time. This documentation has saved me countless hours of re-planning and helps me avoid repeating mistakes.
Your home’s Christmas transformation doesn’t happen in a single afternoon, and it shouldn’t feel like a source of stress. Choose ideas that resonate with your style, adapt them to your space and budget, and remember that the goal is creating an environment where memories happen. The decorations are just the beautiful backdrop for the moments that matter.